The Long Awaited (Mostly) Finished Product!
Yes, it has been over about two and half years since we last updated the blog, and I do apologize to all of you who have requested that we post the final pictures. In our defense, we have been busy during this time. I both started and finished grad school, graduating last June with a Master's degree from UCLA in the Urban Planning program. Then, after graduating, I decided that the time was right to open my own architecture firm. It's called Inchoate and you can be sure I'll be telling you more about it in the future. And, happily, we've also added a new member to our little family - our pup, Pantoufle!!
Now, here's the good stuff. Below are photos of us finishing the kitchen cabinets, pouring a concrete floor and installing a toilet in the bathroom, putting in the wood floor and painting the front door. Then, there are a few shots from our housewarming party and from bringing home Pantoufle. Here you go:

These are the upper cabinets going into our kitchen. We designed them to be free-standing boxes, that are independent of the others around them. Leif and Jason built these boxes out of 3/4" thick bamboo plywood with sliding plexiglass covers.

The two lower boxes have a space left in the back to allow for undercabinet lighting. These are the slim-line fluorescent tube lights that hide behind the lower boxes.

Here are the boxes, almost completely in place.....
Next, we tackled the bathroom floor. It was a thick-set tile that looked dingy and was cracked in many places, yet to completely take it out was more than we wanted to take on at that moment. Instead, we decided to cover it over with a thin set concrete. Above is a photos of the bathroom tile floor being prepped to receive the concrete. The edges are sealed with caulk and tape and coating has been painted on to help with the binding process.

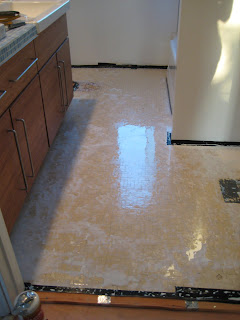
Leif and Jason are mixing up the concrete. This is a self-leveling, thin-set version that you only have about 3-4 minutes to mix and again that long to get put in place, so you have to work really quickly!

Leif and Jason poured the mix in while I (as Spider Woman here) helped level it and get it in all the corners.

But this doesn't look good, does it?!

This was a disappointing moment. We had worked it for too long and the result was bumpy and blotchy. You can see in this photo that Leif was bummed and that Jason is trying to help him feel better. It doesn't help that this was done late at night.... Luckily, the concrete sets so thin that we had enough room in the bathroom to take another shot at it.....

And, voila! The second pour turned out much better!!

Next, we tackled our new toilet. It's a dual-flush, Water Sense certified model from Toto, so it will use a lot less water than a standard 1.6 gpf model. (At the time we installed this, they were actually pretty hard to find. I had to go to a specialty plumbing supply store. It's so nice to see that 2.5 years later, they are common place and you can get similar products at the big stores like Lowe's.)


Here's me trying to figure out how to get the new hardware to work with the old drain.

This is the new toilet base in place. It required some pretty exact placement, which was tricky for us to put into our new concrete floor.

And here is the final product. Doesn't it look pretty!

Moving out of the bathroom now, it was finally time to install our wood flooring. So that we could do it ourselves quickly, we decided to go with an engineered product that was floated over our subfloor. This meant that there was no nailing required!

The first step was to lay out a soft pad over the subfloor. The pad allows some give to the final floor installation and helps it to float as it is designed to. It also keeps the floor squeaks down.

Here is the floor going down. It is a 'click-together' system that fits together like puzzle pieces. It is spaced a little off of each wall and is not nailed down at all. In this way, each floor piece is only connected to the ones around it and the whole floor membrane floats in the room as a large single sheet.

Here is a close up of how each piece clicks into the one next to it.

The floor was a group effort, with Ben, Leif, Jason and I all pitching in.

Here's the whole living room done, with the kitchen in the background waiting. For a continuous look, we decided to use the same flooring throughout the public areas of the house.

Here's the last bit of the wood floor going into the kitchen. It was a puzzle at the end to figure out which pieces to use where so that the joints between the pieces were appropriately staggered.

Here's our lunch break with our work crew - a picnic in the front yard!

Gratuitous cute baby photo!
(Every blog needs at least one, right?)

After our floor was in, we were ready for baseboards. I think that Bernard and Lance did the majority of this for us - thanks guys!

We chose a bright, Carnival Red for the front door color.

Here's Jason getting all the details just right!

Oooo, shiny!

My mom came in to town to help with the finishing touches too. Here she is cleaning all our windows for us - thanks Mom!

Sometimes I don't even want to guess what's in a photo.... Anyone want to hazard a guess as to what Jason is doing here? :)

And here is the end of the last 'official' work day on the house. Great job, guys!

Cheers!

Now, it's time for a housewarming party! Only 3 years after we bought the house - that's not too late, is it?

Welcome friends!


Another gratuitous cute kid picture - I think Tristan was planting watermelon seeds for us.

As usual, everyone likes to gather in the kitchen. Thankfully, ours seems well-suited for it.

A few months after finishing construction, Leif and I were finally able to add to our family. We adopted a puppy and named her Pantoufle (pronounced Pon-toof). She was the feistiest one of the litter, but has turned out to be a very sweet girl who loves all people.

Here we are on the ride home.

And with her first toy in our backyard for the first time.

Here's proof that Pantoufle took to Jason right from the very beginning!
And now for one final house project. We wanted to put up a bookshelf in our entry way.

We used a system called E-Z shelving that really did live up to it's name.

Leif did this one mostly on his own, though you can see that our curious girl is always willing to help with a project too.

He first attached rails to the wall, right over studs. Then, he put brackets on the rails and spanned the shelves between them.

The final product looks good!

Finally, this is what it's all about - a good place to live and share with family and friends. Leif and I would like to thank everybody who helped us so much over the years to get this project done. We couldn't have done it without you, and you know who you can call when you need a hand too. We owe you a lot more than one.....
Thanks!
posted by Inchoate at 2:40 PM
3 comments
![]()
![]()

