A Real, Working Kitchen?! ....almost....
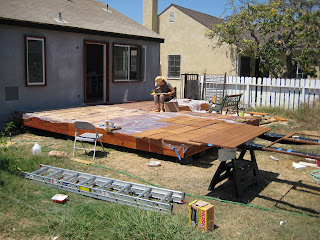
First things first - we really did finish the deck! Take a look:

Next, we are getting details finished all over the place. It is really exciting to parts looking done. Here's our bedroom closet:


Here's that same area from the top. Here the countertop installers have laid out the frame that will support the counter over the top of our cabinet boxes.


 Next, came a lot of sanding and finishing. They nearly covered the whole deck!

Leif finds the shady spot. Be sure to keep straight which container you are sticking your brush into and which one you are drinking out of there!


Here are all of the boards drying in our living room. We finished them with a wax product called Osmo Polyx-Oil that is solvent-free and made from plant oils and waxes. It's very low-odor too so it's okay to use inside.
 Here's that tricky frame piece in place, just waiting for the appliances.

With the countertop in, the next step was to ask our electrician, Mark Barber, and our plumber, Saul Archilla, to come back and finish up their work. You can see in the photo of the front of the house above that the exterior light has been installed by the front door. (We also painted the fascia boards.)


The cooktop is by KitchenAid, as is all of the appliances. That big box below it is our down draft vent. It's the kind that pops up behind the cooktop when you turn it on. As you can see the yellow hose sitting in the cabinet there, the gas has not been connected to the cooktop yet.


This is our pull-out pantry. I think it's pretty nifty!


 Next time, I'll go into a few more details about how the cabinets were installed and note some other finishes, but mostly the news should be about installing the wood floor!

Next, we are getting details finished all over the place. It is really exciting to parts looking done. Here's our bedroom closet:

We bought a freestanding, Ikea system closet and installed it in a nook in the bedroom instead of installing a 'real' closet with doors and such. It was easier for us to install, and we think it's a good look as neither of us are big on sliding, closet doors.

This one is a full 8' tall. It's huge!
So, now to the good stuff! When we last left off with the kitchen, we had assembled our Ikea boxes and put them all in place and level. The countertop had been templated, but not yet installed. This starts at about two weeks ago:

Here are the supports we installed for the overhanging portion of the kitchen counter. It was not easy to find a guide on the right way to do this, so we just used the slimmest brackets we could find and plan on covering them up later so you don't see them.

Here's that same area from the top. Here the countertop installers have laid out the frame that will support the counter over the top of our cabinet boxes.

After hemming and hawing about what do pick for the countertop and if we could somehow do the work ourselves, we decided the best way would be to hire it out. We picked a solid white Corian. That hole above is for the kitchen sink.

And here it is! They installed it in two pieces, but they seal the joint in such a way that you would never know that by looking at it. The joint completely disappears.

Here's the view from the living room.

Next, comes the cutting out the cabinet doors. We were lucky enough to have both Ben over to help for this portion and to have Dan's table saw still on site. It made the job so much faster and easier (and more exact!).
 We're using the same material for the doors that we used for our bathroom cabinets. It's 3/4" vertical-grained, carmelized bamboo plywood that comes in big, heavy, 4' x 8' sheets.
Cutting these doors takes teamwork!
 Next, came a lot of sanding and finishing. They nearly covered the whole deck!
Leif finds the shady spot. Be sure to keep straight which container you are sticking your brush into and which one you are drinking out of there!

This was the trickiest piece. It's the frame behind the wall oven and built-in microwave. We were so afraid of breaking it!

Here are all of the boards drying in our living room. We finished them with a wax product called Osmo Polyx-Oil that is solvent-free and made from plant oils and waxes. It's very low-odor too so it's okay to use inside.
 Here's that tricky frame piece in place, just waiting for the appliances.
With the countertop in, the next step was to ask our electrician, Mark Barber, and our plumber, Saul Archilla, to come back and finish up their work. You can see in the photo of the front of the house above that the exterior light has been installed by the front door. (We also painted the fascia boards.)

Here's the sink in place. We got the sink and the garbage disposal at Lowe's and the faucet from Ikea. The water filter is Aquasana. The sink, dishwasher and microwave oven are all fully operational. We are still waiting for upgraded electrical service to turn the wall oven on. The strip lights on the walls will be covered by our cabinet boxes (the undercabinet lighting).

The cooktop is by KitchenAid, as is all of the appliances. That big box below it is our down draft vent. It's the kind that pops up behind the cooktop when you turn it on. As you can see the yellow hose sitting in the cabinet there, the gas has not been connected to the cooktop yet.

Now comes the really tricky part. We needed to drill the cabinet doors for the hinges. This is pretty exact work and it's very easy to make mistakes on it, so we were pretty nervous about cutting into our nice, finished doors. The especially hard part for us was that we had all of these hinges that came with our Ikea boxes that we wanted to use for the doors, but because the official Ikea doors come with pre-drilled holes, Ikea does not provide you with a drilling template. We had to make one ourselves! (Yikes!) Above, Leif is drilling the first door panel while Jason 'supervises'. You can see our little tester piece on the ground before them.

And here's the first one in place. Not too shabby!

It's the end of another long day. Over the fridge behind me, you can see the first two cabinet doors in place.

Monday evening and we installed the rest of the wall of cabinet fronts. We still need to install most of the pulls and to align the doors by adjusting the hinges (the most annoying part of the job!). You can also see here how the microwave/oven turned out. The space underneath them will be a drawer soon, but we need to go back to Ikea to get the right sized hardware.

Monday evening and we installed the rest of the wall of cabinet fronts. We still need to install most of the pulls and to align the doors by adjusting the hinges (the most annoying part of the job!). You can also see here how the microwave/oven turned out. The space underneath them will be a drawer soon, but we need to go back to Ikea to get the right sized hardware.

This is our pull-out pantry. I think it's pretty nifty!

We laid out the next set to be installed on the floor of the living room to make sure we got them in the right order. They were all cut out from the same piece of plywood to make sure that the grain would align from door to door. The blue tape marks the top, hinge-side of each one.

And here they are in place - almost....

Leif's drilling some more placement holes.

Here's the final side installed around the dishwasher.
 Next time, I'll go into a few more details about how the cabinets were installed and note some other finishes, but mostly the news should be about installing the wood floor!
posted by Inchoate at 1:28 PM
2 comments
![]()
![]()


