A Nice, Big Deck....

This is the 'before' shot of the back yard. Notice the height of the door off of the ground. It's a BIG step down. We really need a deck back there!

We found these interesting concrete block foundations at Lowe's. The idea behind them is that you don't have to dig any holes or pour any concrete, but that you just place these on the ground and then 'float' the deck over them. They are preformed to accept either 2x's laid across them or 4x4 posts standing upright. They get their stability from being attached to the members around them. We won't attach the deck to the house with a stringer though. It will just sit as a floating platform on it's own.
 We started by laying out one line of blocks with one joist perpendicular to the house at a height just underneath the back door threshold in the one place where the blocks would all rest on existing concrete walks.
 Leif makes sure that first one is level.
We cut out little 4x4 posts as we went, making sure that everything was level in multiple directions.

Here's a close-up of the blocks in action. We dug the lawn out down to firm soil to place the block on. Then we custom cut the 4x4 to the right height to be level and used Simpson hardware to hold the joists in place.

There's the finished structure, part of which rests on an existing concrete slab that will become the 'patio'.

The shape of the deck is totally in place. Now comes the pretty part:


Check out my skills of a sealer! Step 1 - Pick straight, good-looking boards. Step 2 - Pick a good sealer. We're using Cabot's Clear Solution in Cedar, the same as was used for our window trim. Step 3 - 'Paint' it on!

Does Leif look tired in this picture? It's hard to tell, but it's about 6:30 am, on a Sunday! That's dedication!

Ben, Steph and Harper came over to help later in the day. Harper helped Steph install the hardware on the bedroom door.
 It looks good, doesn't it? Now this bedroom is the most complete room in the house, as it's only missing trim and the closet fittings.
Later, when Harper was napping, Steph volunteered for some delicate finish work around the windows. She looks so pro!

Ben and Leif are doing a little plumbing work here. We needed to fix the hose bib anyway, as it got broken during construction, so we're relocating it to the edge of the deck.

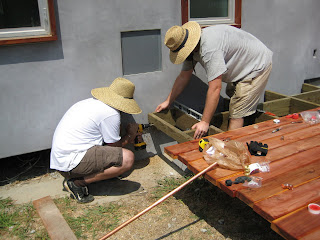
Ben and Leif are straightening things out a bit as they install the deck boards. With the floated system, this kind of adjustment was really easy.

Ben and Leif installing the deck boards

The site supervisor makes sure that the guys are working hard!
....so the deck isn't quite finished yet, but we got really close! We only have to install the skirt boards and seal the top of the decking. Hopefully, there will be finished photos next week.
....so the deck isn't quite finished yet, but we got really close! We only have to install the skirt boards and seal the top of the decking. Hopefully, there will be finished photos next week.


1 Comments:
Wow! What a great story! You told it so well in pictures. I want to build a deck someday and some of the techniques you used are new to me, so thanks for sharing! I'll have to look into all those options. Can't wait to see the finished product!
Post a Comment
<< Home